Expecto patronum shadow box
Harry Potter Expecto Patronum Shadow Box Picture
I have recently bought the sizzix forest frame die and the doe reminded me of Snapes patronus guiding Harry to the sword of Gryffindor in the woods. I used it in a shadow box and then also made a similar shadow box using Harry's stags patronus instead of the doe.
To make the shadow boxes you need the following:
12 X 12 paper or thin card to make the frame.
Pearlescent gold card
Pearlescent white card
Fun foam
Backing paper
Distress Ink
Sizzix thinlits 661744 Forest frame die
Tree trunk die
Tattered lace Alphabet die
Tattered lace Stag Die
Hunkydory Owl Die
Wand die
Needle and thread die docrafts
Making the shadow box
I strongly recommend that you make up one of the shadow boxes as a practice run first. It is a bit fiddly putting it together. It is better to practice with card you are not bothered about then waste a piece you really like.
1. Score each 4 sides of 12 X 12 (30 x 30cm) card at 1.5cm, 3 cm, 4.5cm and 6 cm.
2. Score extra score-lines across just 2 score lines at 7.5cm in from each side of the top and bottom of the card as shown.
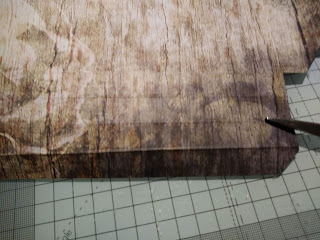
3. Draw a diagonal line as shown and cut off the the sqare at each corner made up of the 16 little squares you have scored and also the two extra little squares and the half square as shown by the shaded area.
4. You should end up with your piece of card looking like this:

5. Carefully bone fold all the scored lines inwards to shape your frame.

6. I tend to snip a little corner off each end of each flap as this can make it slightly easier to fit it all together.

7. Fold in the two opposite sides which do not have the diagonal piece cut off and glue them down.
8. Once in place fold in the sides with diagonal piece cut off and glue them down. Once in place either put a glue dot, a little piece of double sided tape or some wet glue under the diagonal section to hold in place. I secure the frame with low adhesive tape to hold it in lace as it dries.

Once dry you can start to decorate your shadow box.
Making the Expecto Patronus box.
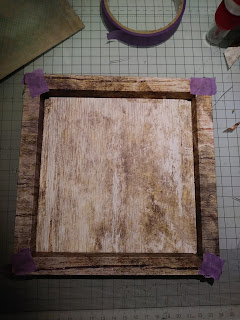
1. Adhere your backing paper to the base of the box as shown. I have used some paper with foliage at the bottom to represent the floor of the forest. Alternatively you could use distress inks to create the night time background and use stamps to create the foliage at the bottom.

2. Cut out the forest frame die in an old gold pearl card and also in a dark craft foam. Trim away the baby deer and the hanging hearts. Glue the pearl die cut piece onto the top of the piece cut out in foam. I found this was the easiest way to give dimension and depth and to support all the little fragile pieces - rather than trying to use adhesive foam pads.

3. Cut out the larger deer in a white pearl card and trim away the excess pieces. glue it on top of the gold deer.

4. Glue this into the inside of your shadow box.
5. I made the wand a swirl from a docraft needle and thread die. I cut it out twice and glued the pieces together. I then cut out a wand dies from the warners brothers harry potter die set and glued this on top. I glued this over the the square as shown and added the word always from die cut letters.
6. I cut out the extra trees and backed these with craft foam then stuck them down as shown. I also cut the grass at the base of the forest frame to cover over the bottom of the trees and and the does feet.

Finally I added the words expecto patronus to the frame.

If you want to make the picture using Harrys stag patronus - cut out a suitably sized stag - I used a tattered lace one. I cut it out twice. I placed some tape on the back of one to keep all the pieces in and I removed the pieces from the other and glued it on top as shown.
For the stag I used distress ink on the backing paper to make it stand out and look as if it is glowing.
When you have cut out the forest frame you need to cut away both the baby deer and the doe as shown. Be careful to leave the tree trunk which goes up the center of the doe as it is easy to cut this off by mistake ( I know I did it!). So cut out the back of the does first then the front. You also need to leave the edge of the frame which runs across the does head in place so cut the ears off and the the head under the frame edge. Once trimmed and glued onto the craft foam glue into the shadow box.
Glue the stag into the center of the frame and add the extra tree branches.
To finish I added an owl cut from a hunkydory moonstone die to represent Hedwig Harrys snowy owl and added expecto patronus to the frame.
I hope you enjoy making these magical shadow box pictures. They can be used either as cards by adding a a card flap to the back or just as a picture to enjoy.


Comments
Post a Comment